My child is deaf in both ears. He wears a hearing aid in his left ear and a cochlear implant in his right ear.


Parts of the hearing aid:
• processor (hangs behind his ear)
• earmold (fits into his ear canal)
• plastic tube (connects processor to ear mold)
• microphone (at top of processor)
• red indicator light (on back of processor)
• controls (on back of processor; disabled for pediatric use)
• battery compartment (at bottom of processor)
Because the controls are disabled, the only way to turn the hearing aid on or off is to open or close the battery compartment.
To take the hearing aid off:
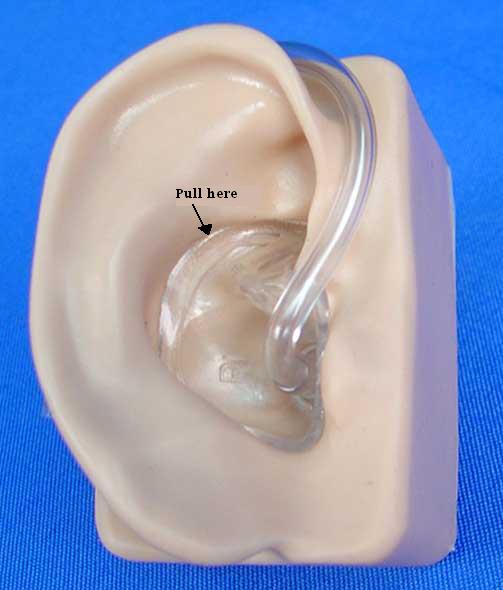
• Pull gently on the earmold, toward the back of his ear. (Don’t pull on the tube.) Remove the earmold from his ear.
• Slip the device off of his ear.
• Open the battery door by pulling at the little tab that sticks out.
• The red indicator light should go off.
• Store the hearing aid in the case provided.
To put the hearing aid on:
• Put a small drop of lubricant (Oto-Ease) on the earmold and smear it around.
• Work the earmold into his ear until it is fully inserted into his ear canal.
• Lift the processor over his ear so that it hangs behind it.
• Close the battery door.
• The red indicator light should come on.
• Ask my child if it sounds all right.
Feedback:
If there is a high-pitched squealing sound, this is feedback caused by amplified sound leaking out around the edges of the earmold and feeding back into the microphone.
• Push the earmold more firmly into his ear so that there are no gaps around it.
• Even if the earmold is seated properly, you might hear some feedback if he puts his hand (or another object, like a hat) up around the microphone. Adjusting the position of the object should eliminate the feedback.
• He can’t hear the feedback and it doesn’t bother him. It’s just a nuisance for others.
Protecting the hearing aid:
The hearing aid could be damaged if it gets wet or if it is dropped onto a hard surface. If it’s raining out, my child should wear a hat and/or be under an umbrella. (He can be in a light mist for a short time without protection.) It’s usually safe for him to wear it at a water table, as long as there isn’t a lot of splashing. He should never wear the hearing aid during swimming, bathing, or running under a sprinkler. Care should be taken that other children do not grab the hearing aid off of his ear or attempt to handle it.
Parts of the cochlear implant system:
• implant (under the skin behind and slightly above his right ear; you can’t see it)
• headpiece (plastic disk that attaches with a magnet to the skin over his implant)
• cable (runs from the headpiece down under his shirt to the processor)
• processor (worn in a harness under his shirt)
How it works (roughly!):

• Sound is picked up by a microphone on the headpiece.
• It is carried by the cable to the processor.
• It is digitized, processed so as to optimize speech perception, and turned into a signal that can be sent to his auditory nerve.
• This is sent back up the cable to the headpiece.
• The signal is broadcast across the skin to the implant, which fires electrodes that are inserted into his cochlea and stimulate the auditory nerve.
To take the CI equipment off:
• Slide the processor out of the pouch on the harness.
• Remove the headpiece from his head (the processor will start beeping).
• Turn the program dial on the processor to the off position (it will stop beeping).
• Gently guide the headpiece and cable out of his shirt. Be careful not to tug too hard on the cable.
• Put all of the equipment in a safe location.
To put the CI equipment on:
• Run the headpiece and cable (they should stay attached to each other, and to the processor) under his shirt and out through his collar.
• Turn the processor on by turning the program dial from the off position to Program 1 (1 dot). The processor will start beeping.
• Watch the indicator light, located near where the cable plugs into the processor. It should blink red quickly, 3-4 times, to indicate that the battery is strong. If it only blinks once or twice, the battery is low.
• Attach the headpiece to his head by placing it against his skin behind his ear and feeling around until the magnet clicks into place. The processor will stop beeping. Make sure the cable is not twisted or kinked, or caught on his harness.
• If the system is working properly, the indicator light will blink green whenever it receives a medium-to-loud sound. Say “ba-ba-ba” and watch the light.
• Ask my child if it sounds all right.
• Put the plastic cap on the processor and push it down into the pocket on his harness.
If the processor starts beeping:
• If it beeps at a regular frequency, about once a second, this means that the headpiece has come off his head. Just put it back on.
• If it beeps intermittently, this probably means that the battery is making poor contact or is running low. First try wiggling the battery in its compartment to see if that seats it better. If the beeping persists, turn the processor off and then back on and watch the indicator light; if it flashes 3-4 times (in red, quickly), the battery is strong. If it flashes 1-2 times, the battery is getting low. Replace it with the back-up battery that we provide. (A single battery should last all day, but sometimes they don’t charge properly at night.) Another thing to try is to take the battery out and put it back in to see if it makes better contact.
• If it doesn’t seem to be a problem with the battery, it may be that another part of the system is failing (the cable or headpiece). If it’s early in the day, please contact us so that we can try to fix the problem and he doesn’t go without sound for a long time. If it’s late in the day, wait until we get there. If he seems to be hearing all right, let him continue to wear the equipment. If the equipment is clearly not working, take it off and store it until we get there.
Protecting the CI:
Just like the hearing aid, any part of the CI could be damaged by water or a hard blow, and the same care should be taken to protect it. If my child plays at a water table, he should wear an art smock to protect the processor under his shirt. There is also a slight risk of damage to the CI from static discharge, which can occur if he goes down a plastic slide or through a plastic tunnel. We don’t want to forbid him from using such play equipment, so we’re willing to take some risk. When possible, try to ground him when he gets to the bottom of a plastic slide by tapping his leg or hand (not his head), but we understand that this is not always practical when caring for many children at a time.


